Frontend settings
Besides the backend settings, several frontend configuration options are available to customize your Fleio installation.
How to edit frontend configuration files
Frontend configuration files format is JSON. There is one configuration file for each file panel:
enduser.config.jsonstaff.config.json
When editing a JSON configuration file, make sure you do not add a comma (,) after the last item in a JavaScript
dictionary, otherwise it will lead to a syntax error. E.g.:
{
  "urls": {
    "backendApiUrl": "//localhost:8000/api/",  // comma, since other items follow
    "homeName": "enduser",
    "enduserUrl": "/"  // last item, no comma
  },  // more items after this one, so comma is required
  // ..
Edit frontend config files with fleio edit
To edit these files, you can use the shortcut command fleio edit:
fleio edit enduser.config.json
# or
fleio edit staff.config.json
Alternatively, access config files with fleio bash
The three JSON files are stored in Docker volumes and can also be accessed with the utility command fleio bash
(which launches a temporary Docker container, just to allow you to edit Docker volume contents).
After you run fleio bash, you can access the frontend configuration files in the following paths:
/var/webapps/fleio/frontend/enduser/assets/config/enduser.config.json/var/webapps/fleio/frontend/staff/assets/config/staff.config.json
How to see all available frontend settings
To see all available frontend settings (documented or undocumented), enter the frontend Docker container and print
the content of the following files.
Important
Do not edit the files mentioned below. These are base configuration files and Docker containers should be treated as immutable. Use the content of these files just for your reference and overwrite properties as described in How to edit frontend configuration files.
# launch bash in the frontend container
docker exec -it fleio-frontend-1 bash
# list all available end-user settings
cat /var/webapps/fleio/frontend/enduser/assets/config-base/enduser.config.json
# staff settings
cat /var/webapps/fleio/frontend/staff/assets/config-base/staff.config.json
# press CTRL + D to exit a Docker container
How to change the top logo
Depending on which panel’s logo you want to customize, place the logo files in one of the following paths in the frontend Docker container:
/var/webapps/fleio/frontend/staff/assets/img/staff/
/var/webapps/fleio/frontend/enduser/assets/img/enduser/
Note
The logo image should be 140 x 70 pixels in size, otherwise the browser resizes the image to this dimension and the logo may get distorted. It’s recommended that the logo image has a transparent background.
To preserve you changes on upgrades or restarts, you need to create a custom Docker image.
The next step is to change the logoDark and logoLight in the following files:
fleio edit staff.config.jsonfleio edit enduser.config.json
You will have to replace null with "REPLACE_ME_WITH_THE_CORRECT_FILENAME.png"
How to change default language
In order to change the default language for Angular panels, you need to change the defaultLanguage variable from the
end-user or staff panels. In order to replace some strings from english default language,
check related documentation page.
{
  // ...
  "settings": {
    // ..
    "defaultLanguage": "en",
  }
}
How to change default theme
In order to change the default theme of a certain panel, be it end-user or staff, you will have to edit the configuration file and change the following line:
{
  // ...
  "settings": {
    // ..
    "defaultTheme": "spring",
  }
}
Configure which themes show up in my profile
You can configure the list of themes that shows up when users edit their profile, be it end-user or staff, by editing the configuration file and changing the following line:
{
  // ...
  "settings": {
    // ..
    "availableThemes": [
      "spring",
      "navy",
      "dusk",
      "dark"
    ],
  }
}
Change the page size
Fleio uses infinite scroll to display objects list. By default, 20 objects are loaded at once and you can change this default value for end-user or staff by editing the corresponding configuration file.
{
  // ...
  "settings": {
    // ..
    "paginateBy": 20
  }
}
Customize page title
In order to customize the page title of a certain panel, be it end-user or staff, you will have to edit the configuration file and add the following line:
{
  // ...
  "settings": {
    // ..
    "baseTitle": "Fleio", // This is the prefix that is added the HTML <title> of each page
  }
}
Customize idle timeout
In order to configure the seconds after user is considered idle and the app stops refreshing content, be it end-user or staff, you will have to edit the configuration file and change the following line:
{
  // ...
  "settings": {
    // ..
    "appIdleTimeout": 30,
  }
}
Customize search bar minimum characters
In order to configure the minimum number of characters a user needs to fill in the search bar of the application for objects to be filtered, be it end-user or staff, you will have to edit the configuration file and change the following line:
{
  // ...
  "settings": {
    // ..
    "minSearchLength": 3,
  }
}
How to invalidate users’ dashboard
When users change their dashboard, the new layout is saved in their browser local storage. If you add customizations to it and want users to have the dashboard refreshed with the new changes and invalidate the layout saved in local storage, be it in end-user or staff panel, you can make use of a dashboardVersion setting which you can change by editing the configuration file. When you set a new version (any string), saved layouts are invalidated.
{
  // ...
  "settings": {
    // ..
    "dashboardVersion": "",
  }
}
How to change required credit card message
If you configure the app to require clients to have a credit card saved from client configuration settings, a message is shown in end-user dashboard. In order to override it you have to edit the end-user configuration file and change the following line:
{
  // ...
  "settings": {
    // ..
    "requireCardValidationMsg": "<span class=\"fl-red-color\">Payment information is required to use our service.</span>",
  }
}
How to add a custom message when user needs to verify instance resize
When users resize instances they need to confirm the resize and a message is shown. To add an extra message besides the one already shown, be it end-user or staff, you will have to edit the configuration file and change the following line by adding the string you want:
{
  // ...
  "settings": {
    // ..
    "openstack": {
        "instances": {
            "verifyResizeExtraMessage": null,
        }
    },
  }
}
How to add a custom message when user shuts down an instance
When users stop instances a confirm action dialog is shown. To show a red message on this dialog, be it end-user or staff, you will have to edit the configuration file and change the following line by adding the string you want:
{
  // ...
  "settings": {
    // ..
    "openstack": {
        "instances": {
            "shutDownInstanceNote": null,
        }
    },
  }
}
Instance form / How to change flavors selection display
Flavors selection display on instance create form can be changed using the flavorsAsCards property from
the config file.
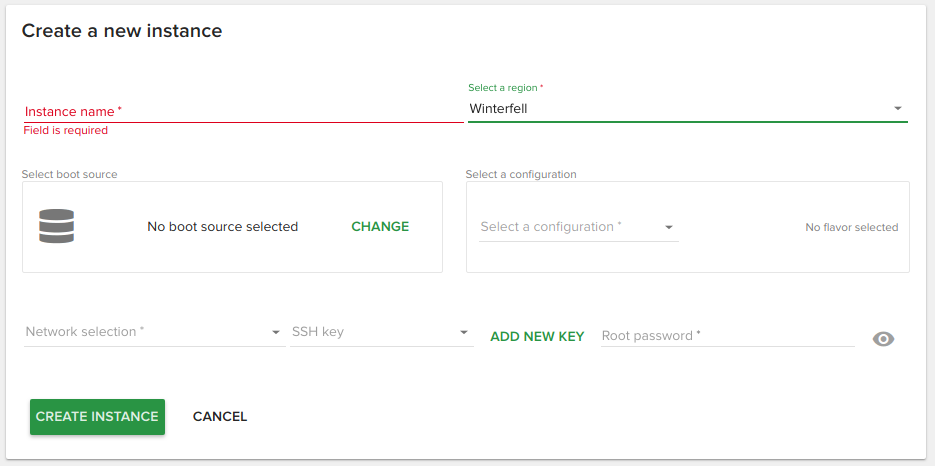
When set to false, the instance create form will look like this:
When the setting is set to true, the flavors will be displayed as cards. Their description will appear in each card’s body:

  {
    // ...
    "settings": {
      // ..
      "instanceForm": {
          // ..
          "flavorsAsCards": false,
          // ..
      },
      // ..
}
Instance form / Show or hide cloud-init user data
The Cloud-init user data field allows the user to fill in a cloud-init script when creating a compute instance:
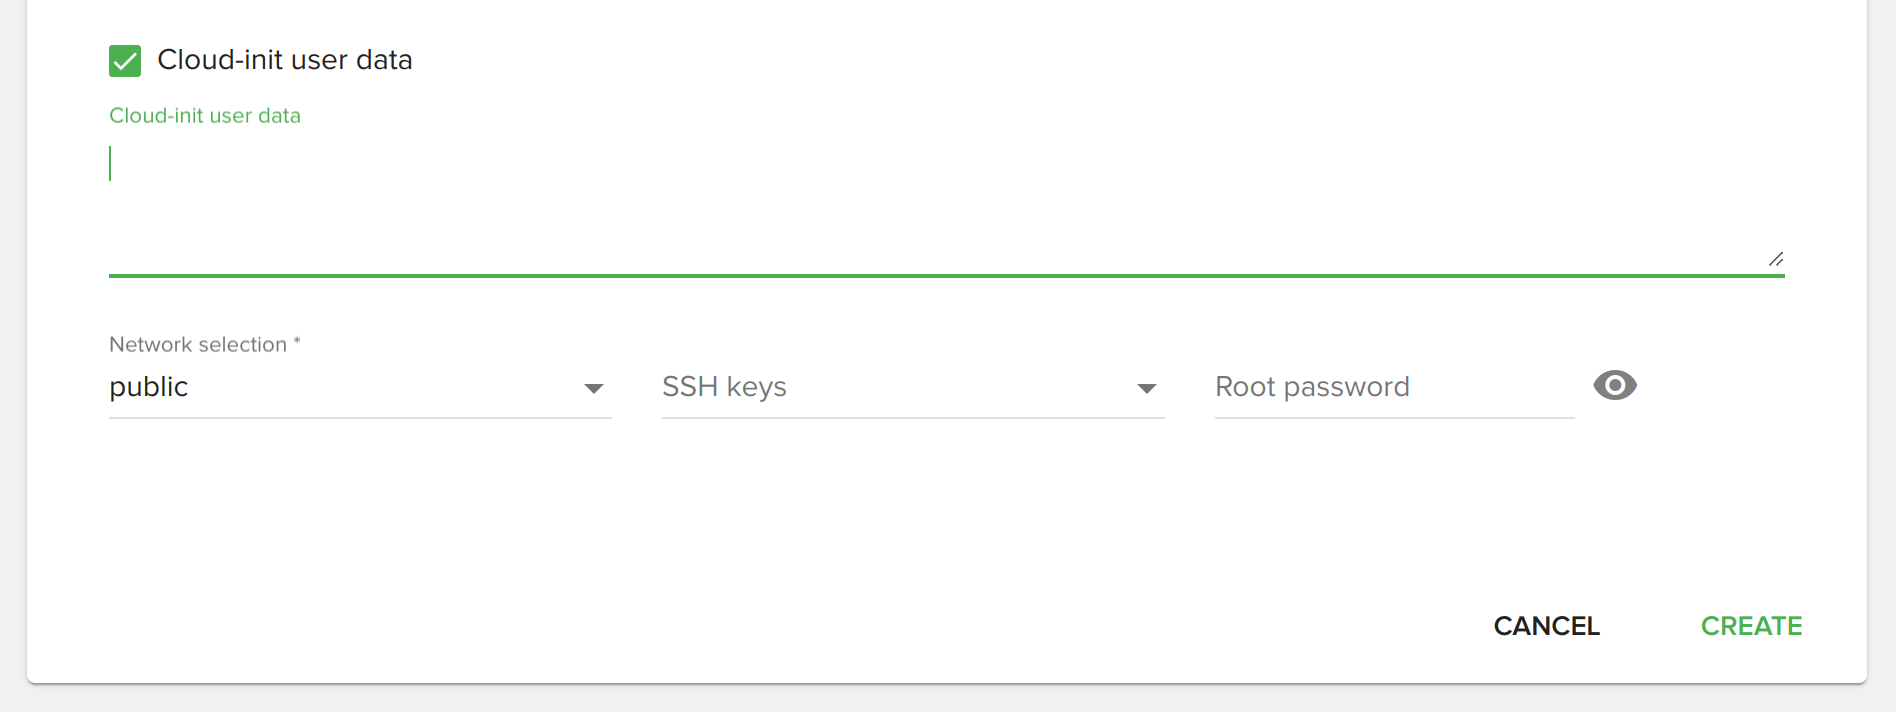
By default, this field is displayed, but you can change that by adding/changing the showUserData property in one of
the frontend configuration files.
{
  // ...
  "settings": {
    // ..
    "instanceForm": {
      // ...
      "showUserData": true,
      // ...
    }
  }
}
Instance form / Hide SSH field when Windows image is selected
By default, SSH field is displayed when user selects a Windows image as boot source, but you can change that by
adding/changing the hideSshForWindows property in one of the frontend configuration files.
{
  // ...
  "settings": {
    // ..
    "instanceForm": {
      // ...
      "hideSshForWindows": true,
      // ...
    }
  }
}
Instance form / Setup scheduled backup on instance create
By default, users can setup a scheduled backup when creating a new instance, but you can hide these fields by
adding/changing the setupScheduledBackup property in the frontend configuration files.
{
  // ...
  "settings": {
    // ..
    "instanceForm": {
      // ...
      "setupScheduledBackup": true,
      // ...
    }
  }
}
Hide volume options for flavors with disk size
Set property hideVolumeSelectionForFlavorsWithDisk. See Instance form / Volume related settings.
Global setting for card or table items display
By default, most of the list views in Fleio show items as cards, you can make all show as lists/tables by using the
itemsDisplayAsList property in the frontend configuration files.
Note that the user will still be able to change the display mode for a page using the top-right of a page.
The itemsDisplayAsList property defines just the default display mode.
{
  // ...
  "settings": {
    // ..
    "itemsDisplayAsList": false,  // only use a comma if there are other items after this one
    // ..
  }
}
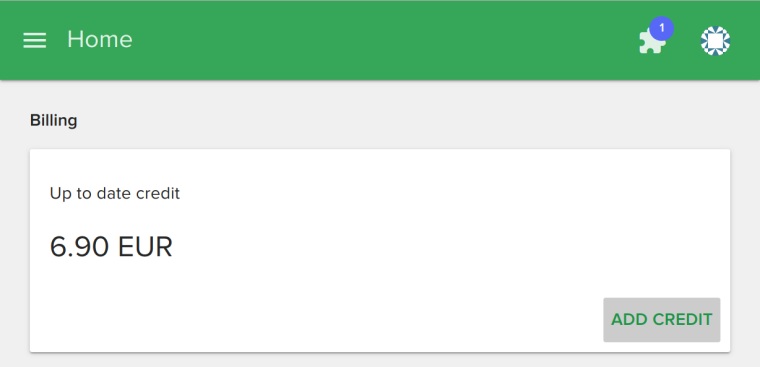
How to set a custom add credit URL
The Add credit button from the end-user’s dashboard can be customized to any link. You can for instance set an external link, if you are using another system (like WHMCS) to handle invoicing and credit card payments.
More on that on settings.py ADD_CREDIT_URLS setting documentation.
The Billing panel that shows client’s credit and the Add credit button can be hidden completely through an end-user feature toggle.
How to set custom logout URL
By default your customers will be redirected to the login page when they log out. If you want to set a custom URL you
need to set the logoutRedirect property in the config file.
{
  // ...
  "settings": {
    // ..
    "logoutRedirect": null,  // null is the default value and it redirects to the standard Login page
    // ..
  }
}
How to change refresh intervals in the app
Refresh intervals are configured in milliseconds for various places in the app, you can edit them by changing the config file:
{
  // ...
  "settings": {
    // ..
    "refreshIntervals": {
      "defaultInterval": 10000,
      "defaultIntervalShort": 5000,
      "defaultIntervalTab": 3000,
      "clientDetailsInterval": 5000,
      "operationsListInterval": 1000,
      "operationDetailsInterval": 1000,
      "reportDetailsInterval": 1000,
      "operationsInProgressInterval": 5000,
      "routerDetailsInterval": 5000,
      "volumeDetailsBackupsInterval": 2000,
      "volumeDetailsSnapshotsInterval": 2000
    },
    // ..
  }
}
How to enable expand/collapse replies in ticket details
Expand/collapse replies in ticket details feature can be enabled by editing the related setting from the config file:
{
  // ...
  "settings": {
    // ..
    "collapsedTicketRepliesFeature": true
    // ..
  }
}
How to change toast notifications duration
Sometimes, notifications or errors appear in Fleio in the form of Angular material toasts. You can configure their
duration with the messageDuration and messageWithLinkDuration (for toasts containing link buttons)
properties in the config files (values in milliseconds):
{
  // ...
  "settings": {
    // ..
    "messageDuration": 2000,
    "messageWithLinkDuration": 4000,
    // ..
  }
}
Activate persistent filters
You can configure filters to be saved when they are changed on views and re-applied when navigating pages through the
app with the persistentFilters property in the config files:
{
  // ...
  "settings": {
    // ..
    "persistentFilters": true,
    // ..
  }
}
Changing text editor on tickets plugin, etc.
The rich text editor found on tickets plugin, message templates edit page, etc. can be customized by adding/editing
the tinyMCEOptions dictionary in the JSON config files.
{
  // ...
  "settings": {
    // ..
    // Add the tinyMCEOptions section if it's missing from your file. You don't need to add all properties below, but
    // only the ones that you want to customize.
    "tinyMCEOptions": {
      "base_url": "/tinymce",
      "height" : "390",
      "relative_urls": true,
      "convert_urls": false,
      "browser_spellcheck": true,
      "inline": false,
      "plugins": "link code codesample lists autolink",
      "toolbar": [
        "undo redo | styleselect | bold italic underline strikethrough | alignleft aligncenter alignright alignjustify | link code blockquote codesample | bullist numlist | removeformat"
      ],
      "codesample_languages": [
        {
          "text": "Code",
          "value": "any"
        }
      ],
      "skin": "oxide",
      "theme": "silver",
      "menubar": "",
      "branding": false,
      "contextmenu": false,
      "promotion": false  // last item in a JSON/JavaScript dictionary must be without a trailing comma
    },
    // ..
  }
}
White label
If you want to remove the small Fleio link that appears at the bottom of the login screen and at the bottom of the left menu, you have to purchase the white-label option.
Changing the top logo is a simple setting and does not require you to pay the white-label fee.
Custom favicon
Adding new custom themes
To define new Angular themes see Frontend customization.
Adding custom headers in requests
Include custom JavaScript/CSS code
See Example: Change favicon, add custom CSS and Google Analytics.